Heads up!
There are 12 figures provided in this post which contain two or more images. You can jump directly to them and skip the explanations, which are only deemed needed in such case what’s happening in the images isn’t clear.
What you need (only essential materials):
- 6 square sheets to be folded as individual modules, which will be assembled to create the cube. Each module represents the side of the cube.
Average time it takes:
- ~10 minutes
Difficulty: Easy

Fig. 1. The origami sheets should be square. Designate the front and the back.
If you have a differently colored back-to-back sheet, you’re free to choose for the front and the back. (There’s not much of an option if you have a single-colored, adjacent-sided sheet, is there?) The front side will be the exterior side of the cube once it is assembled.
The size doesn’t matter, as long as it’s square. For this box/cube, the length of the sides of the square sheet is 15 centimeter.

Fig. 2. Fold the sheet into half. Unfold, then fold the two halves into half.
Fold the sheet into half (either crosswise or lengthwise). Here, it’s crosswise.
Unfold, so you see the crease in the middle that divides the sheet into upper and lower halves.
Fold the two halves into their halves by bringing the top and the bottom edges aligned with the crease in the middle. This makes the sheet horizontally divided into fourths with three horizontal creases cutting through.
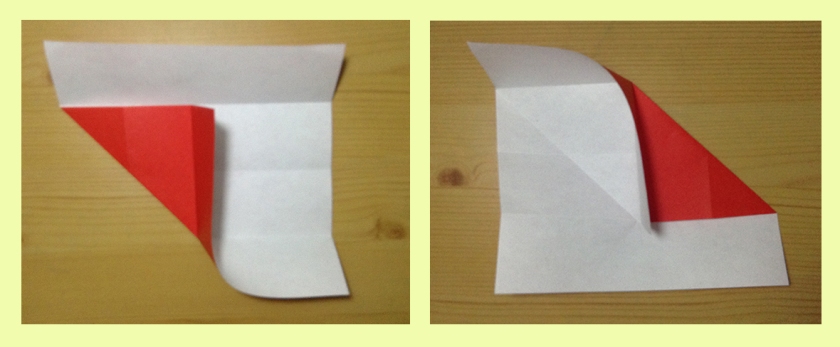
Fig. 3. Fold diagonally the lower left-hand side and the upper right-hand side.
At this time, there are three horizontal creases. Let’s call them the top, the middle, and the bottom.
On the left-hand side of Fig. 3:
- From the left-hand end of the top crease, fold diagonally the lower left-hand vertical edge until it overlaps with the top crease. Do not extend the fold beyond the bottom crease.
One right-hand side of no. 3:
- From the right-hand end of the bottom crease, fold diagonally the upper right-hand vertical edge until it overlaps with the bottom crease. Do not extend the fold beyond the top crease.

Fig. 4. Fold the the sheet as the creases suggest.
On the left-hand side of Fig. 4:
- First, look at the top (upper left-hand side) and bottom (lower right-hand side) creases, and the middle vertical gap.
- Bring down the flaps that make the vertical gap so you fully reveal the white-colored side of the sheet (as in the right-hand side of no. 4).
- While bringing down the vertical flaps, fold the the flaps of the top (upper left-hand side) and the bottom creases (lower right-hand side). Doing this hides the white surface.
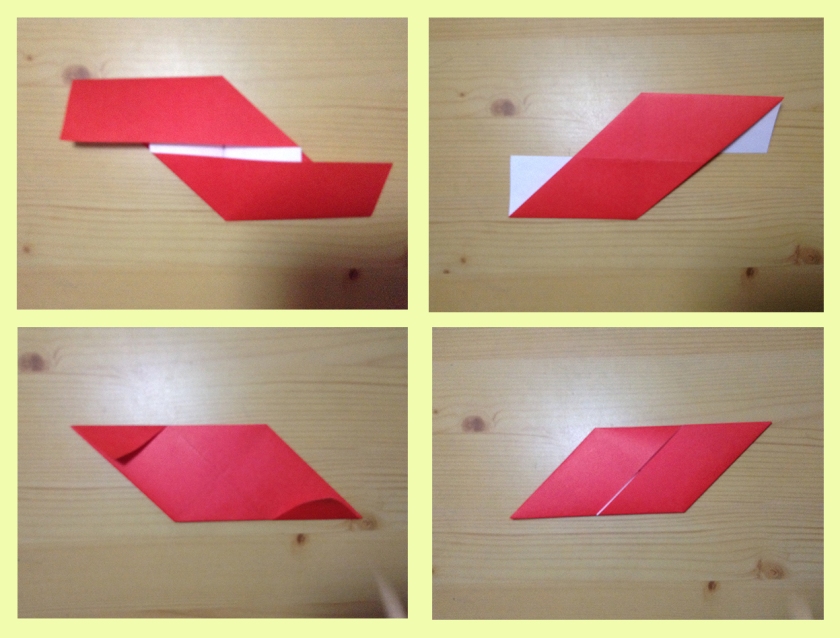
Fig. 5. Now you have your first module, a rhomboid.
Turn the module over (referring to the first image, on the upper left-hand side). See those white surfaces, fold them against the red surface following the edge (see third image, on the lower left-hand side). Turn it over again and see now the rhomboid with a slit in the middle of the left and right diagonal edges.

Fig. 6. Create vertical creases to turn the module into a square, which will be the side of the cube.
Turn the module as in the first image (leftmost, hand-wise). Fold the right triangle appendages so you create a square-shaped surface.

Fig. 7. Six modules are needed. Each of them makes a side of the cube.
Repeat Figs. 1-6 five more times to complete 6 modules that will each be a side of the box/cube.

Fig. 8. Assemble the modules together. Start with the four (not included the top and the bottom sides).
Insert the right triangles into the slits of the modules (i.e. yellow modules into the red modules here in the image). Right triangles as appendages serve as connectors. Slits serve as locks.

Fig. 9. Secure the insertions.
Fully insert the modules into one another.

Fig. 10. Four-side cube framework.
In Fig 9, the second image sees the assembled module turned over horizontally. This is to bring the red module (leftmost, no. 9 second image) atop (no. 10 first image) to enable the yellow module be inserted into its slit (no. 10, second image).
At this point, two modules are still left untouched. They will be used for the top and bottom sides.

Fig. 11. Seal the top side with one of the two modules left. (In this image, the last yellow module.
Looking at the first image as top view, there are now front, back, left and right sides of the origami cube.
We seal the top with the last yellow module available. On the second image, the red is inserted into the slit of the yellow module. The same thing is done with the fourth image. The slit of the yellow module serves as the lock.

Fig. 12. Seal the bottom side and lock everything in place.
In the first and second images:
- Let’s put the bottom of Fig. 11 to top view, and use the only remaining module (which if you followed this tutorial exactly including the colors used, should be red). We do the same as done in Fig. 11 to end up with what is shown in the second image.
In the third and fourth images:
- After finishing off the last two sides, it’s time to lock in the rest of the connectors that haven’t been inserted into their respective slits yet. This might be a little difficult, but it’s the same process. Once it’s done you now have a paper cube.
Where can you use it?
I usually do origami to make something out of the paper pieces I have no more use or I have nothing to use for from the get go. Say, leaves of outmoded planners (that are not mine, since they do not work for me), coffee shop brochures, or classy newspapers.
But this cube, I once used it for a class project. There were six questions to be answered about a blind date we were asked to sign in. Because the instructor asked they be presented creatively – and I’m not artsy creative – and I hated the activity of being put up in a date with someone I didn’t know, I inscribed each of my answers to each side of the origami cube. While dislodging the modules is easy to crack, it sure still gave my instructor a knack.
He was trying to dissect it in class and he almost tore the whole thing apart. I wanted him to, so he would never have got to read my account. But he decided to put it off until later when I can neither confirm nor deny his success in his attempt to peer through my thoughts about that blind date terror.

Daanke für die süsse Maus! Wird natürlich ausprobiert.
LikeLike
Danke! 😀
LikeLike